
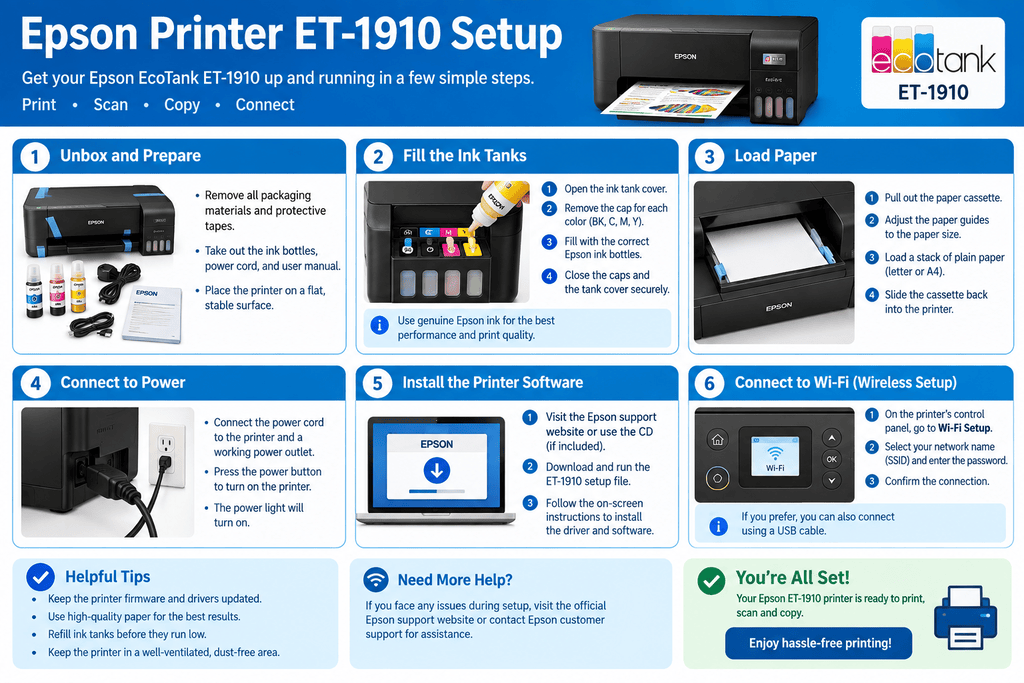
Setting up an Epson EcoTank ET-1910 should be straightforward, but problems can occur when the printer is not connected to the correct Wi-Fi network, the required software is missing, or the computer and printer are using different connection methods. The Epson Printer ET-1910 Setup process normally involves preparing the printer, installing the appropriate Epson software, connecting it to Wi-Fi or USB, and testing a print job.
The ET-1910 supports wireless networking, Wi-Fi Direct, USB printing, AirPrint, and other network printing methods. Its Wi-Fi specification uses the 2.4 GHz band, so network configuration can matter during installation.
Quick Answer
For Epson Printer ET-1910 Setup, first complete the printer’s initial physical and ink setup according to the supplied instructions. Then install the current ET-1910 software for your operating system from Epson’s official support site. Connect the printer to the same Wi-Fi network used by your computer or phone, or select USB if you prefer a wired connection. Finally, add the printer in your operating system and print a test page. Epson also supports the Smart Panel app for compatible mobile devices.
What Does This Mean?
The ET-1910 is an EcoTank printer, so installation involves more than simply plugging in a conventional cartridge printer.
During the first setup, you need to prepare the printer and install the ink correctly before configuring wireless printing. Epson specifically notes that initial setup and ink installation must be completed before wireless printing is configured.
After that, the printer needs a communication path to your device:
- Wi-Fi: The printer and computer or phone communicate through your wireless network.
- USB: The printer connects directly to a computer with a compatible USB cable.
- Wi-Fi Direct: A compatible device can connect more directly to the printer without relying on the normal home-network arrangement.
- Mobile printing: Compatible phones and tablets can use Epson Smart Panel and supported mobile-printing features.
Epson provides an ET-1910 Setup Navi page, manuals, drivers, utilities, and troubleshooting resources for the model. Available software can differ according to operating system and country or region.
Common Causes of Epson ET-1910 Setup Problems
Most installation problems come from a small number of configuration issues.
| Symptom | Possible Cause |
|---|---|
| Printer is not detected | Computer and printer are on different networks |
| Wi-Fi setup fails | Incorrect Wi-Fi password or incompatible network configuration |
| Computer cannot print | Correct Epson software or printer connection has not been added |
| Phone cannot find printer | Phone and printer are not connected to the same wireless network |
| USB setup does not work | Cable, port, driver, or operating-system issue |
| Printing works from one device only | Other device may be connected to a different network |
| Print quality is poor after setup | Initial ink preparation or print-head maintenance may be required |
A particularly common mistake is assuming that all devices connected to the same physical router are necessarily using the same network. Epson’s documentation explains that different SSIDs can place devices on effectively different networks.
Step-by-Step Solutions
1. Prepare the ET-1910
Place the printer on a stable, level surface near a suitable power outlet.
Remove packaging and protective materials, then follow the supplied setup instructions for filling the ink tanks. Do not rush the initial ink procedure, because the printer needs to prepare its ink system before normal printing.
When this matters: This step is essential for a new printer. If the printer has already been installed and is being moved to another computer, you generally do not need to repeat the initial ink setup.
2. Check the Network
If you plan to use Wi-Fi, identify your wireless network name, or SSID, and have the network password ready.
The ET-1910 supports 2.4 GHz Wi-Fi.
Make sure the computer or phone you will use for printing is connected to the intended network.
If your router provides separate network names for different bands or guest access, verify that the printer and device are using a compatible network configuration.
3. Install Epson Software
Visit Epson’s support page for the ET-1910 and select your operating system before downloading software. Epson provides drivers, utilities, manuals, and setup resources for the printer.
Do not rely on a random third-party driver website. Using Epson’s current software reduces the risk of installing an incorrect or outdated package.
During installation, follow the prompts for either a wireless or USB connection.
4. Connect the Printer to Wi-Fi
For wireless installation, follow the setup software or Epson’s Setup Navi instructions.
The general process is:
- Turn on the ET-1910.
- Start Epson’s setup software.
- Choose the wireless or Wi-Fi connection option.
- Select the correct wireless network when prompted.
- Enter the Wi-Fi password carefully.
- Allow the installer to complete the printer configuration.
- Add or select the ET-1910 when your operating system detects it.
The exact screens can vary between Windows, macOS, and different software versions, so use the instructions displayed by the current Epson installer rather than assuming every menu will look identical.
5. Set Up a Mobile Device
Epson states that the ET-1910 is compatible with the Epson Smart Panel app for supported iOS and Android devices.
For a typical mobile setup:
- Connect the phone to the intended Wi-Fi network.
- Complete the printer’s initial setup.
- Install and open Epson Smart Panel.
- Follow the application’s instructions to add the printer.
- If the printer is not detected automatically, use the app’s option to set up a new product.
Epson notes that Bluetooth should be enabled during the Smart Panel setup process and that the phone needs to be close enough to the printer for the initial connection process.
6. Try USB if Wi-Fi Is Unstable
If wireless setup continues to fail, a USB connection can be useful for troubleshooting or for a computer that does not need wireless printing.
Connect the printer directly to the computer and select the USB connection during software installation.
The ET-1910 documentation states that USB 3.0 cables are not supported, so follow Epson’s cable requirements rather than assuming every USB cable will work.
| Solution | Difficulty | Estimated Time |
|---|---|---|
| Check Wi-Fi and SSID | Easy | 5 minutes |
| Install Epson software | Easy | 10–15 minutes |
| Configure Wi-Fi | Easy–Moderate | 10–20 minutes |
| Set up mobile printing | Easy | 5–10 minutes |
| Switch to USB | Easy–Moderate | 5–15 minutes |
| Reconfigure an existing network connection | Moderate | 10–20 minutes |
7. Print a Test Document
Once setup is complete, print a simple document.
If the printer appears in your operating system but does not print, check:
- Whether the correct ET-1910 is selected.
- Whether the printer is showing an error or warning.
- Whether the computer and printer are still connected to the same network.
- Whether a previous print job is stuck in the queue.
- Whether the printer software is current.
If the problem is print quality rather than connectivity, use Epson’s maintenance and print-quality instructions rather than repeatedly reinstalling the driver. Epson’s ET-1910 documentation includes dedicated guidance for poor print quality, cleaning, paper problems, and other issues.
Tips to Prevent the Problem
A few simple habits can make future Epson ET-1910 setup and troubleshooting easier.
Tips to Prevent the Problem
A few simple habits can make future Epson ET-1910 setup and troubleshooting easier.
- Keep the printer within reasonable wireless range of the router.
- Record your current Wi-Fi network name and password somewhere secure.
- Keep Epson software and firmware reasonably current.
- Avoid installing drivers from unofficial download sites.
- Use the correct paper settings for the media being printed.
- If multiple computers use the printer, make sure they are connecting to the same intended network.
- If you change routers or Wi-Fi names, expect to reconfigure the printer’s network connection.
- Use Epson’s model-specific documentation when a procedure differs from another EcoTank printer.
If you need to reinstall software, Epson provides an operating-system-specific download area through its ET-1910 support page.
Frequently Asked Questions
1. How do I start Epson Printer ET-1910 Setup?
Begin with the printer’s physical and ink setup. After that, install the appropriate Epson software and configure Wi-Fi or USB depending on your preferred connection method.
2. Does the ET-1910 support Wi-Fi?
Yes. The ET-1910 supports Wi-Fi networking, including 2.4 GHz wireless operation.
3. Can I set up the ET-1910 from my phone?
Yes. Epson lists the ET-1910 as compatible with Epson Smart Panel on supported iOS and Android devices.
4. Why can’t my computer find the Epson printer?
Check whether the printer and computer are connected to the same intended network. Different SSIDs can result in devices being on separate networks even when they use the same router.
5. Can I use USB instead of Wi-Fi?
Yes. USB is an alternative connection method. However, Epson specifies that USB 3.0 cables are not supported for this model.
6. Why does Wi-Fi setup fail even with the correct password?
Check the wireless band, SSID, signal strength, and network configuration. The ET-1910’s documented Wi-Fi operation uses 2.4 GHz, so router settings can affect setup.
7. Can several computers use the ET-1910?
Yes. Multiple devices can use a network-connected printer, provided they are configured to access the same printer and appropriate network.
8. Do I need a driver for the ET-1910?
Depending on your operating system, Epson software or an operating-system printer driver may be used. Epson recommends selecting your operating system on its support page to see the applicable downloads.
9. What should I do if setup worked but printing does not?
First check the selected printer, connection status, print queue, paper, and any printer warnings. If the issue is print quality, use Epson’s maintenance guidance instead of treating it as a network problem.
10. Where can I find the ET-1910 manual?
Epson provides the ET-1910 User Guide and other documentation through its official support resources.
11. Does the setup procedure vary by computer?
Yes. Windows, macOS, Android, and iOS can present different setup screens. Epson also notes that available downloads depend on the selected operating system and region.
12. What if the printer still will not connect?
Try restarting the printer and router, verify the network details, and repeat the model-specific setup procedure. If the problem continues, consult Epson’s current ET-1910 support documentation rather than applying fixes intended for another model.
Final Thoughts
A successful Epson Printer ET-1910 Setup depends mainly on completing the initial printer preparation, installing the correct software, and ensuring that the printer and device are using the intended connection. For Wi-Fi, pay particular attention to the network name, password, and 2.4 GHz compatibility. For mobile printing, Epson Smart Panel provides a supported setup path on compatible devices.
If the setup still fails, work through the connection method one step at a time. Checking the network before reinstalling software can often prevent unnecessary troubleshooting. For model-specific downloads, manuals, and current instructions, use Epson’s official ET-1910 support resources.


Leave a Reply